Creating Custom Clothing Template
Clothing Template Configuration File
A clothing template configuration file is a JSON file which should be located inside the /configs subfolder of your mod. There are specific rules for the filename of these files:
clothing-[category]_[templateid].json
Valid values for [category] is tops, skirtspants, outerwear, footwear, and accessories. These determines the corresponding clothing template's categorization.
[templateid] should only contains alphanumeric characters and underscores.
You can see various examples of these filename rules in the Default Library, which is available in the /library subfolder inside Mannequin Character Generator's installation directory.
Data Structure - General Information
Below is an example of a clothing template file taken from the default library, clothing-tops_tanktop_vneck_untucked.json
{
    "name" : "Tanktop (Untucked, V-Neck, Worn Underneath)",
    "layer": "under",
    "onePiece": false,
    "defaultColors": [ "#EAE9EE" ],
    "requirements": [
        [ "body-uppertorso-a", "body-uppertorso-b" ]
    ],
    "torsoLength": "medium",
    "layers": [
        ...
    ]
}
name is the template name that will be displayed in Mannequin Character Generator's user interface.
layer determines which clothing will be worn underneath or over other clothing items. The value of this property can be a number ranging from 0 to 4 or string with either one of these values: skin, under, base, middle, outer. The string values is just an alternative for numbers; for example, skin is the same as 0, outer is the same as 4.
Clothing templates with lower layer value will be placed underneath others with higher value. Clothing with the same category and layer value cannot be equipped together. When a conflict is detected, the one that has been chosen to be added by the user will replace the one that is already equipped.
onePiece is a property that is exclusive to clothing templates which is categorized as tops. Setting this value to true will make the clothing template act as both top and skirt/pants.
defaultColors is an array of string which determines how many color groups your template has, and what is the default colors of each color groups. In this example, you can sww that we only have one color group, with the default color #EAE9EE. The color code inside this array should always follow the above example, in hexadecimal format with # symbol at the beginning.
requirements is a two-dimensional array which determines the prerequisites of this clothing template. The first dimension is used for logical operator AND, and the second dimension is used for logical operator OR.
In the example above, you can see that the template requires body-uppertorso-a OR body-uppertorso-b to be present in order to pass compatibility check.
If the array structure is changed to something like this:
"requirements": [
    [ "body-uppertorso-a" ],
    [ "body-uppertorso-b" ]
],
Then it now means that body-uppertorso-a AND body-uppertorso-b should be present in order for this clothing template to be compatible.
torsoLength is an optional property exclusive to clothing templates which is categorized as tops or outerwear. This is used to determine the length of the torso part of the clothing, which is worn untucked. The value of this property can be either short, medium, or long.
You can also make a clothing template which is designed to be worn tucked. Let's look at this example taken from the default library, clothing-tops_tshirt_crewneck_shortsleeves_tucked.json
{
    "name" : "T-Shirt (Tucked, Crew Neck, Short Sleeves)",
    "layer": "base",
    "onePiece": false,
    "defaultColors": [ "#EAE9EE", "#D8D2E3" ],
    "requirements": [
        [ "body-uppertorso-a", "body-uppertorso-b" ]
    ],
    "tucked": [ "low", "medium", "high" ],
    "fallback": "tops_tshirt_crewneck_shortsleeves_untucked",
    "layers": [
        ...
    ]
}
As you can see above, there are two different properties that is now present: tucked and fallback.
tucked is an array which determines what skirts/pants waist height that is compatible with this tucked clothing template. In the example above, you can see that the clothing template is compatible with all of the waist height options: low, medium and high.
If the current skirt/pants waist height that is currently equipped is not found in the array or no skirt/pants that allows tucked tops/outerwear is equipped, then the template file set in fallback property will be used instead. In the example above, clothing-tops_tshirt_crewneck_shortsleeves_untucked.json will be used as fallback. Note that 'clothing-' in the beginning and '.json' extension at the end is not used in this part.
Now how about the skirts/pants related to this tucked/untucked behavior? Let's see an example below, clothing-skirtspants_a_line_skirt_short_highwaist.json taken from the default library.
{
    "name" : "A-Line Skirt (Short, High Waist)",
    "layer": "base",
    "defaultColors": [ "#5B1F98" ],
    "requirements": [
        [ "body-lowertorso-a" ]
    ],
    "tuckable": "high",
    "layers": [
        ...
    ]
}
In the example above, there is another unique property, which is tuckable. This property is used to set the corresponding skirt/pants template as compatible with tucked tops, and define its waist height. The value of this property is of course one of the predefined waist height options already mentioned above: low, medium, and high.
Data Structure - Layers
The biggest part of each clothing template configuration is of course the layers data. The layers property is an array of objects with information regarding what graphic asset to use, in what position and other related things. Below is the layers part of the first example file above, clothing-tops_tanktop_vneck_untucked.json
...
   "layers": [
        {
            "bindTo": "chest",
            "colorGroupID": 0,
            "deformTo": 1,
            "removeWhenWrapped": true,
            "componentName": "under_tanktop_stretch_wrap"
        },
        {
            "bindTo": "chest",
            "colorGroupID": 0,
            "deformTo": 1,
            "componentName": "under_tanktop_deep_v_neck_stretch"
        },
        {
            "bindTo": "chestshadow",
            "bindMode": "replace",
            "componentName": "0"
        },
        {
            "bindTo": "uppertorso",
            "colorGroupID": 0,
            "bindMode": "back",
            "componentName": "under_tanktop_collar_back"
        },
        {
            "bindTo": "uppertorso",
            "colorGroupID": 0,
            "removeWhenWrapped": true,
            "componentName": "under_tanktop_stretch_wrap"
        },
        {
            "bindTo": "uppertorso",
            "colorGroupID": 0,
            "componentName": "under_tanktop_deep_v_neck_stretch"
        },
        {
            "bindTo": "lowertorso",
            "colorGroupID": 0,
            "removeWhenWrapped": true,
            "componentName": "under_tanktop_medium_length_stretch_wrap"
        },
        {
            "bindTo": "lowertorso",
            "colorGroupID": 0,
            "componentName": "under_tanktop_medium_length_stretch"
        },
        {
            "bindTo": "lowertorso",
            "componentName": "under_tanktop_medium_length_stretch_shadow"
        }
    ]
...
As you can see, the most essential properties of each object is bindTo and componentName. bindTo determines what layer/body part this particular object will be rendered over, and componentName is the unique part of the SVG file that will be rendered. To see the list of available body part codes, check the pose template files that is available in the default library folder (pose-*.json files).
The exact SVG filename that will be used is constructed using this pattern:
clothing-[bindTo]-[componentName]-[shape]-[pose].svg
The values for variant and pose are taken from the current base template data and pose template data, available in the default library folder (/library subfolder inside Mannequin Character Generator's installation directory). You can see it from the example below. First is from the base template file template-female_a.json
{
    "name" : "Female A",
    "shapes" : {
        ...
        "lowerTorsoShape" : "a",
        ...
    },
    ...
}
And second is from the pose template file pose-female_a-standby.json
{
    "name" : "Standby",
    "layers" : [
        ...
        {
            "id": "lowertorso", "pose" : 1,
            "x" : 320, "y" : 624 , "rotation" : 0,
            "horizontalScale" : 1, "verticalScale" : 1
        },
        ...
    ]
}
Based on the template files above, if we take this clothing layer object:
{
    ...
    "layers": [
        ...
        {
            "bindTo": "lowertorso",
            "colorGroupID": 0,
            "componentName": "under_tanktop_medium_length_stretch"
        },
        ...
    ]
}
And formulate a filename based on the rules, it will return: clothing-lowertorso-under_tanktop_medium_length_stretch-a-1.svg
By default, Mannequin Character Generator will look for this SVG file inside the default library folder. If you are making your own DLC and want to use your own graphic assets inside your own DLC's /components subfolder, you can add [your_dlc_authorid]:[your_dlc_id]/ at the beginning of componentName. One example is available below, taken from the included Christmas Collection DLC.
{
    ...
    "layers": [
        ...
        {
            "bindTo": "left-lowerarm",
            "removeWhenWrapped": true,
            "colorGroupID": 1,
            "componentName": "AR14:christmasCollection/under_santagloves_accent_wrap"
        },
        ...
    ]
}
colorGroupID is the index that will determine the color group of this particular clothing layer object. Not putting this property will leave the corresponding object out of any color groups, which means that users will not be able to change its color.
bindMode tells Mannequin Character Generator how to render the corresponding clothing layer object. Not setting this property will default to front which means that the current clothing layer object will be rendered in front of related body part or other clothing layer items that are already equipped. You can also set this to back, which means that the corresponding clothing layer object will be rendered behind related body part or other clothing layer items that are already equipped. Lastly, you can set this property's value to replace, which means that this particular clothing layer will replace any of the related body part including clothing layer objects that are already equipped.
removeWhenWrapped is a boolean that if set to true, will tell that the corresponding object needs to be removed when there is other clothing layer object rendered in front (if bindMode is set to front) or back (if bindMode is set to back) of this clothing layer object. If not set, this property will default to false.
Data Structure - Advanced Layers
For tucked tops and outerwears, componentName can be an object instead of string. Here is an example from the default library, clothing-tops_tshirt_crewneck_longsleeves_tucked.json
{
    ...
    "layers": [
        ...
        {
            "bindTo": "chest",
            "colorGroupID": 0,
            "deformTo": 1,
            "removeWhenWrapped": true,
            "componentName": {
                "low": "base_tshirt_stretch_wrap",
                "medium": "base_tshirt_stretch_tucked_medium_waist_wrap",
                "high": "base_tshirt_stretch_tucked_high_waist_wrap"
            }
        },
        ...
    ]
}
As you can see, the object contains three properties: low, medium and high, each containing the specific component name for the corresponding skirt/pants waist height. If the clothing template is set to be only compatible with medium and high waist height, for example, then the property low can be left out.
For skirts, componentName can also be an object. Here is an example taken from clothing-skirtspants_pleated_skirt_short_highwaist.json
{
    ...
    "layers": [
        ...
        {
            "bindTo": "lowertorso",
            "colorGroupID": 0,
            "removeWhenWrapped": true,
            "componentName": {
                "long": "base_pleated_skirt_high_waist_long_top_wrap",
                "medium": "base_pleated_skirt_high_waist_medium_top_wrap",
                "short": "base_pleated_skirt_high_waist_short_top_wrap",
                "default": "base_pleated_skirt_high_waist_wrap"
            }
        },
        ...
    ]
}
The object contains four properties: long, medium and short, each containing the specific component name for the corresponding tops/outerwear torso length; default is the one that will be used if no tops/outerwear is equipped or no data regarding tops/outerwear torso length is available. If either one of long, medium or short is not defined, then default will take over when needed.
match can be used in addition to bindTo for more flexibility in layer order. Using match alongside bindTo will limit the effect of bindTo to just layer positioning. Below is an example from clothing-outerwear_blazer_double.json
{
    ...
    "layers": [
        {
            "bindTo": "chest",
            "match": "uppertorso",
            "colorGroupID": 0,
            "componentName": "outer_blazer_db_collar_cover"
        },
        ...
    ]
}
With this code, the SVG filename that will be used is clothing-uppertorso-outer_blazer_db_collar_cover-*.svg instead of clothing-chest-outer_blazer_db_collar_cover-*.svg The position, scale and rotation will follow uppertorso body part, but the layer order will be in front of chest (instead of uppertorso).
You can also add clothing component name in your bindTo value, if you want to make the corresponding clothing layer object appear in front/back or replace another clothing layer object that is already placed. An example for this is available in the clothing-accessories_shirtribbon_thick.json
{
    ...
    "layers": [
        ...
        {
            "bindTo": "uppertorso-base_shirt_tight_collar_band",
            "colorGroupID": 0,
            "componentName": "base_shirt_tight_collar_ribbon_band"
        },
        ...
    ]
}
This means that clothing-uppertorso-base_shirt_tight_collar_ribbon_band-*.svg will be placed in front of clothing-uppertorso-base_shirt_tight_collar_band-*.svg
If clothing-uppertorso-base_shirt_tight_collar_band-*.svg is not used in the current composition, then this clothing layer object will not show up.
deformTo is commonly used in the default library to change the chest shape. An example is shown below, taken from
{
    ...
    "layers": [
        ...
        {
            "bindTo": "chest",
            "colorGroupID": 0,
            "deformTo": 1,
            "componentName": "base_tshirt_stretch"
        },
        ...
    ]
}
By using deformTo, the chest shape will change to [originalshape][deformTo]. For example, if the original chest shape is a, then it will become a1. Therefore, the filename of the clothing asset should now use clothing-chest-base_tshirt_stretch-a1-*.svg instead.
Clothing Template Art Assets
The color palette of your clothing templates' graphic assets should always be limited to these:
- Fill (both solid and gradients):
#3C4C72(base color),#4B5D7F(highlight color),#131C43(shadow color),#F5F5F5(backlight color) - Stroke:
#0C1535 - Fill for cast shadows (both solid and gradients):
#151515
Cast shadows must be separate SVG files because a different blending mode will be applied to them.
To prevent clipping when multiple clothing items is used at the same time, always use the graphic assets of body template as starting point. From that, expand the thickness of your clothing graphic asset by 0.5 pixel depending on the designated clothing template layer property, starting from under to outer (or 1 to 4 if you prefer to use numbers).
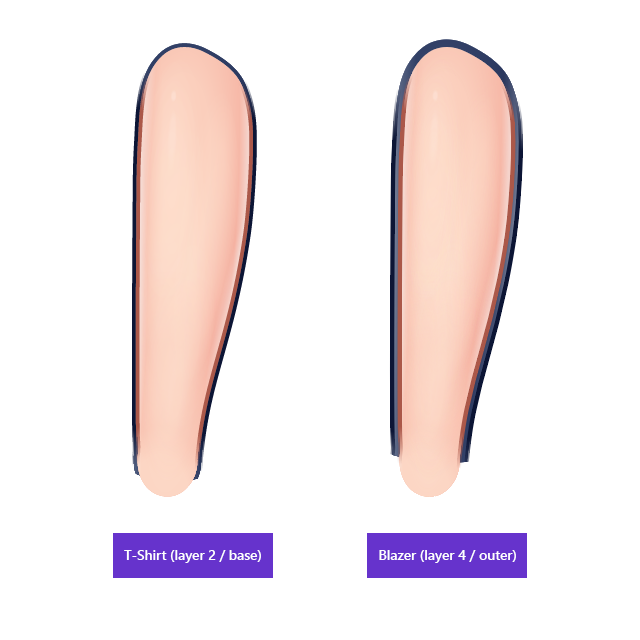
Below is an example of how clothing template for t-shirt (layer 2 / base) differ in thickness versus blazer (layer 4 / outer), magnified four times. The t-shirt asset is 1px thicker compared to the body part asset, and the blazer asset is 2px thicker compared to the body part asset.
Of course, most clothing is not skin-tight and we want to use a more diverse shapes for our clothing template. This is where wrap layer is used, utilizing the boolean property removeWhenWrapped set to true. Below is the graphic assets for sweater/hoodie, the lower torso part:
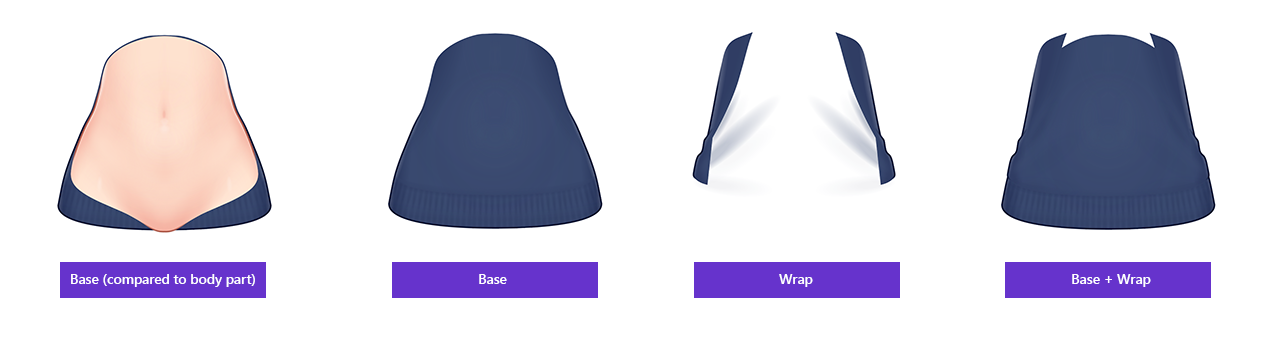
By setting the removeWhenWrapped property to true for the 'wrap' layer object, it will be removed when other clothing layer object is rendered in front of it, thus avoiding clipping.