Expressions
The Expressions Sidebar
The Expressions sidebar is the third topmost tab of the sidebar, which is available on the left side of the screen. From this tab you can change between the available brow, eye, nose, nose, mouth and face color templates.
In Mannequin Character Generator, an Expression is a combination of the chosen brow, eye, nose, mouth and face color template including all of their color and position adjustment settings. Your character can have multiple expressions in a single file. This section will allow you to manage those expressions easily.
A newly created character will only have Default expression initially. Use the right-pointing triangle on the right side of the expression name to switch between all of the available expressions. From the drop-down menu that opens, you can also choose to add a new expression, rename the current expression, delete the current expression or manage all of the existing expressions using a more granular interface.
Saving and loading expressions are done through .mqne file. Loading an expression from a .mqne file will overwrite your currently active expression with the data obtained from the .mqne file. If you want to load an expression from file without overwriting your currently active expression, then you can click Manage Expressions... on the drop-down menu.
Manage Expressions
From the Manage Expressions window, you can do various things, such as:
- Importing expressions from external file.
- Exporting expressions to external file.
- Sorting all expressions by name, whether ascending or descending.
- Delete single or multiple expressions.
- Manually adjust their order by moving up, moving down, moving to top or to bottom.
Clicking an expression will select it, and clicking again will deselect it. When multiple expressions are selected, using the export function will save all of those selected expressions into a single file. Expressions imported from external file through this window will appear as new entries, rather than overwriting existing ones.
Brow
In this section you can see the currently active brow template you're using, adjust their color, height, separation, and provides the option to change it via the folder icon on the right side of the brow template name. Clicking this icon will show the library window which list all of the available brow templates. From this window, you can select the brow template that you want to use by clicking on the thumbnail and then clicking the 'Continue' button.
To change brow color, you can input a hexadecimal color code in the corresponding input field or access the color picker by clicking the right pointing triangle at the right side of the input field.
Eye
In this section you can see the currently active eye template and iris template you're using, adjust eyelash color, iris color, eye height, separation, size and provides the option to change the templates via the folder icon on the right side of the template names. Same as brow above, clicking this icon will show the library window which list all of the available eye templates. From this window, you can select the eye template that you want to use by clicking on the thumbnail and then clicking the Continue button.
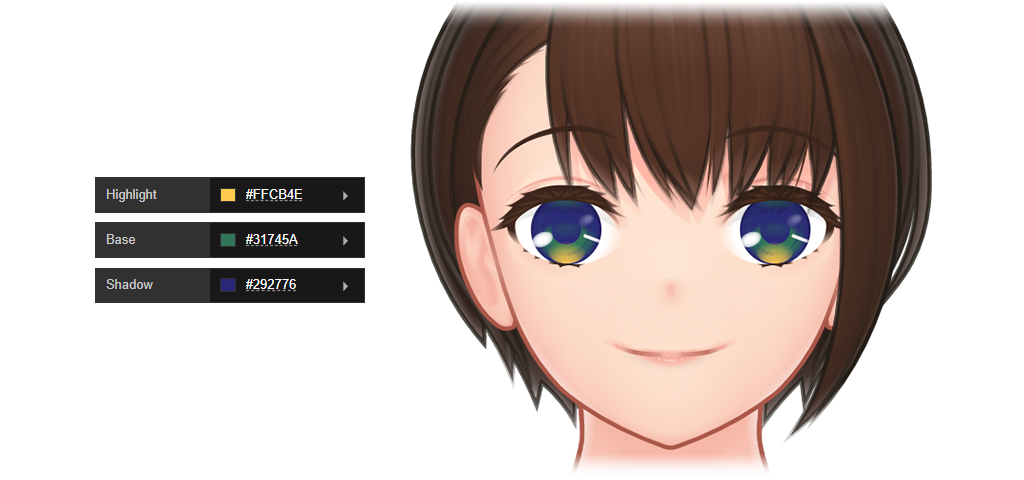
There are more controls available for iris color. You can adjust whether you want to enable Heterochromia (different left and right iris color), enable Shine/Reflection, or enable Use Advanced Colors which allows base, highlight and shadow color of the iris to be adjusted. Below you can see how each parameter affect the eye color.
To change any of the color parameters available, you can input a hexadecimal color code in the corresponding input field or access the color picker by clicking the right pointing triangle at the right side of the input field. You can also enable Use Advanced Colors to change base, highlight, shadow and backlight color individually. Below you can see how an iris color with Use Advanced Colors enabled looks. If you're using a different iris template, then the color implementation might differ.
You can also adjust Gaze Direction via the circles representing various available directions.
Nose
In this section you can see the currently active nose template you're using, adjust their height, size and provides the option to change it via the folder icon on the right side of the nose template name. Same as eye above, clicking this icon will show the library window which list all of the available nose templates. From this window, you can select the nose template that you want to use by clicking on the thumbnail and then clicking the Continue button.
Mouth
In this section you can see the currently active mouth and teeth template you're using, adjust their height, size, lip color and provides the option to change those via the folder icon on the right side of the mouth template name. Same as nose above, clicking this icon will show the library window which list all of the available mouth or teeth templates. From this window, you can select the mouth or teeth template that you want to use by clicking on the thumbnail and then clicking the Continue button.
You can change lip color by entering a hexadecimal color code in the corresponding input field or by accessing the color picker which will show up after clicking the right pointing triangle at the right side of the input field.
Face Color
In this section you can see the currently active face color template you're using, adjust their color and provides the option to change it via the folder icon on the right side of the face color template name. Same as mouth above, clicking this icon will show the library window which list all of the available face color templates. From this window, you can select the face color template that you want to use by clicking on the thumbnail and then clicking the Continue button.
You can change the color configuration of the currently active face color template by entering a hexadecimal color code in the corresponding input field or by accessing the color picker which will show up after clicking the right pointing triangle at the right side of the input field.
Fine-Tuning
Expressions are a subtle thing, and therefore minor adjustments can bring significant differences. To do this, look for Fine-Tuning in each section of the Expression sidebar. Depending on the face parts, the fine-tuning parameters can be different. Eye, for example, can be adjusted to make it larger, smaller, more raised, lowered, and closer or further apart.
Applying Colors and Fine-Tuning to Multiple Expressions
Mannequin Character Generator treats each expression as separate, even in regards of coloring. This can be useful to make your character change eye color when angry, for example. However, wanting to have the same brow/eye/lip colors across every expressions is of course a normal thing. To achieve this faster, you can look for the three dots icon and click it. Various time-saving options will be shown depending on the corresponding item, such as copying colors from and to another expression (or all expressions). These time-saving features also available for Fine-Tuning parameters for every face parts.